The Curse Game:
Hey guys, this is my walk-through / cheat sheet for The Curse Game by Mojo Bones / Toy Studio.
The Curse Game is a puzzle/strategy game with over 100 unique puzzles and engaging cutscenes, one of which will have you scratching your head for ages whilst shaking it in disbelief.
It’s a really engaging game with lots of different types of puzzle. Some of them are really hard and I suspect are designed to get you to buy hints which isn’t necessarily a bad thing. It’s a cracking game and has many levels that you can’t “cheat” on or look up the answer which makes it all the more interesting and infuriating at the same time. This walk through will give you the answers and the tools you need to pass every level apart from the cheat proof ones but there are still over 80 answers!
I really hope that you find this helpful, feel free to share this on your social pages but please do not copy any of the work. I will happily allow you to post this on your own site as long as you credit me.
- Tangram #1 – solution here
- Riddle #1 – STARS
- Magic squares – it’s different every time – simple add up game
- Sliding Blocks #1 – Solution here – follow the screenshots. It’s not move by move but should be quite easy to follow, just make sure your screen matches the screenshot before moving to the next one.
- Button gauge #1 – buttons change positions but it’s quite easy
- Match-it #1 – Matching icon changes every time but it shouldn’t be too hard
- Bulbs #1 – I can’t help you here. You need to copy the movements of the lights.
- Tangram #2 – solution here
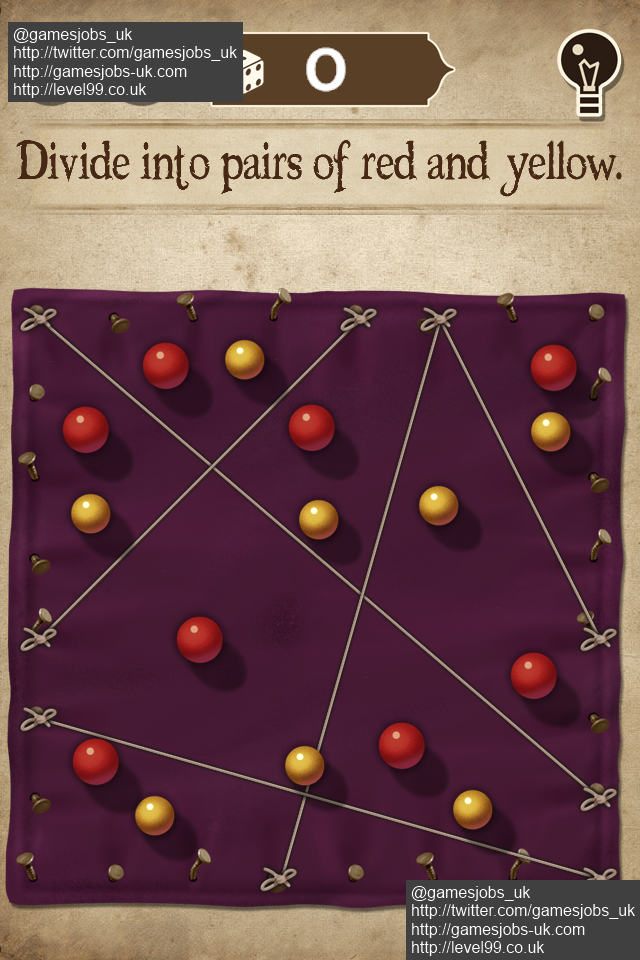
- Draw the line #1 – solution here
- Riddle #2 – PAPER
- Circuit #1 – solution here
- Jars #1 – There are three jars Large (L), Small (S) and Medium (M). Divide the liquid as follows L to M, M to S, S to L. You have 6 in the large jar and 2 in the medium jar. Pour M into S, L to M, M to S and S to L to solve
- Lights Out #1 – solution here
- Untangle #1 – Trial & error puzzle but not too difficult
- Sliding Blocks #2 – Solution here – follow the screenshots. It’s not move by move but should be quite easy to follow, just make sure your screen matches the screenshot before moving to the next one.
- Burn The Rope #1 – solution here
- Logic Wheel – Trial and error but it’s not hard to line up the gems as long as you use both directions
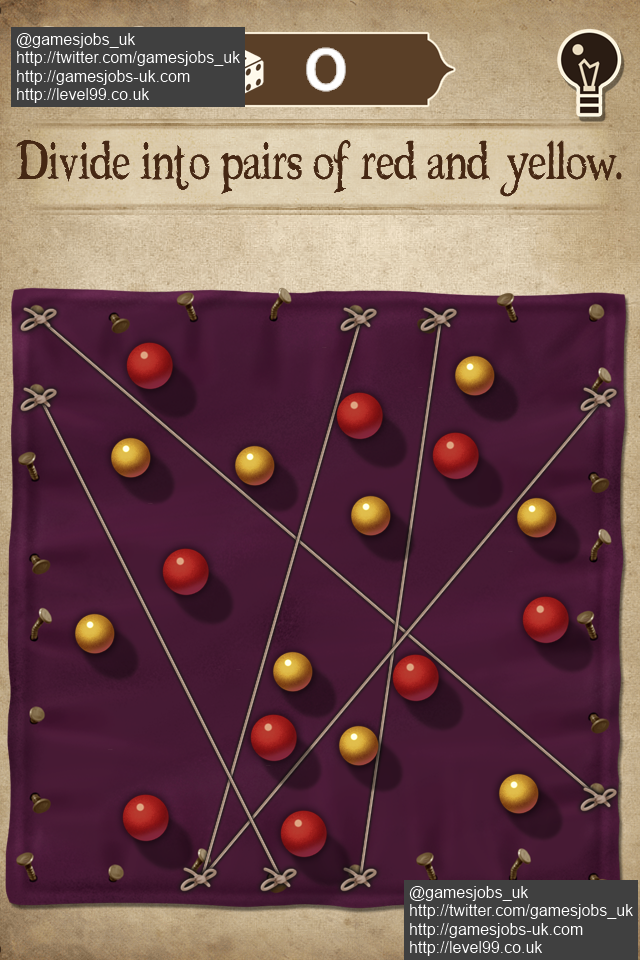
- Draw The Line #2 – solution here
- Riddle #3 – ORGAN
- Hamiltonian #1 – solution here
- Rotating Picture – solved picture here – you’ll need to match it

#21 – Rotating Picture
- Burn The Rope #2 – solution here
- Dominoes #1 – It’s slightly different every time but not too difficult to solve.
- Stopper #1 – Reflex game; cant’ help you with that!
- Hamiltonian #2 – solution here
- Riddle #4 – PRANK
- Lights Out #2 – solution here
- Tangram #3 – solution here
- Circuit #2 – solution here
- Sliding Blocks #3 – Solution here – follow the screenshots. It’s not move by move but should be quite easy to follow, just make sure your screen matches the screenshot before moving to the next one.
- Solitaire #1 – Number the grid as shown in the picture and follow the numbered instructions ie 8>;18 means move the stone occupying box 8 to box 18 etc.

Solitaire 1 Solution
- Riddle #5 – REVEL
- Burn The Rope #3 – solution here
- Code Box – Harder version of mastermind code changes every time so you’ll need to buy some hints or hope for luck. If you’re really struggling I suggest following these instructions, the principles are the same and with a hint extending your guesses to 20 the puzzle should be solved relatively easily.
- UnTangle #2 – Trial and error
- Tangram #4 – solution here
- Match-it #2 – Matching icon changes every time – You might get a lucky guess
- Jars #2 – Large, Medium, Small. L to M, M to S, S to L, M to S, L to M, M to S to solve
- Sliding Blocks #4 – Solution here – follow the screenshots. It’s not move by move but should be quite easy to follow, just make sure your screen matches the screenshot before moving to the next one.
- Riddle #6 – RADAR
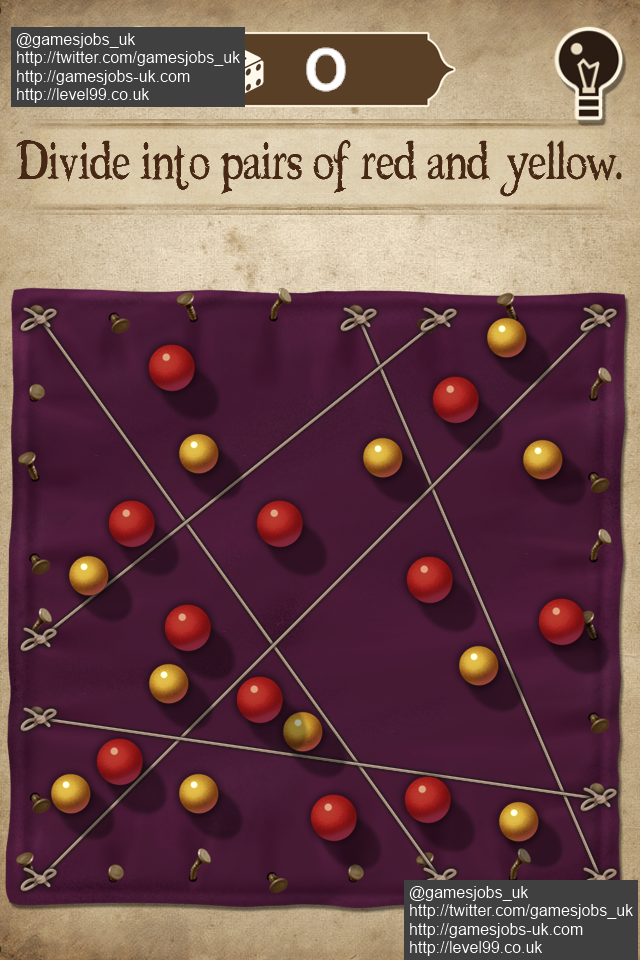
- Draw The Line #3 – solution here
- Circuit#3 – solution here
- Lucas Problem – solution below or click herefor the full sized image

Lucas Problem Solution
- Bulbs #2 – You just need to copy the sequence. A simple memory game
- Button Gauge #2 – Reaction game
- Sliding Blocks #5 – Solution here – follow the screenshots. It’s not move by move but should be quite easy to follow, just make sure your screen matches the screenshot before moving to the next one.
- Burn The Rope #4 – solution here
- Tangram #5 – solution here
- Lights Out #3 – solution here
- 1 To 8

1 to 8 Solution
- Riddle #7 – TEARS
- Draw The Line #4 – solution here
- Hamiltonian #3 – solution here
- Sliding Picture

Sliding Picture Solution
- Tangram #6 – solution here
- Sliding Blocks #6 – Solution here – follow the screenshots. It’s not move by move but should be quite easy to follow, just make sure your screen matches the screenshot before moving to the next one.
- Riddle #8 – NTGNY
- Burn The Rope #5 – solution here
- Combination – The numbers change positions – pot luck can really help with this level
- Pathway – Memory game, use a pen and paper if you’re having trouble
- Dominoes #2 – It’s slightly different every time but not too difficult to solve.
- Lights Out #4 – solution here
- Hamiltonian #4 – solution here
- Circuit #4 – solution here
- Riddle #9 – HOUSE
- Stopper #2 – Reflex game, quite difficult but the trick is not to get frustrated with it, try a few times and leave it for a while if you’re having trouble.
- Tangram #7 – solution here
- Solitaire #2 – Number the grid as shown in the picture and follow the numbered instructions ie 15>;17 means move the stone occupying box 15 to box 17 etc.

Solitaire 2 Solution
- Riddle #10 – QUEUE
- Magic Square #2 – it’s different every time, trial and error
- Sliding Blocks #7 – Solution here – follow the screenshots. It’s not move by move but should be quite easy to follow, just make sure your screen matches the screenshot before moving to the next one.
- UnTangle #3 – Trial and error, you may have to buy extra time with a hint
- Match-it #3 – You just need to look closely. Failing that pick a spot and keep choosing that one until it’s right as the pictures move places every time you try. The last method should take no more than 8 re-tries.
- Button Gauge #3 – trial and error again I’m afraid
- Tangram #8 – solution here
- Riddle #11 – HOLES
- Draw The Line #5 – solution here
- Circuit #5 – solution here
- Sliding Blocks #8 – Solution here – follow the screenshots. It’s not move by move but should be quite easy to follow, just make sure your screen matches the screenshot before moving to the next one.
- Bulbs #3 – Memory game, marking the bulbs as numbers and writing the “combination” down helps.
- Burn The Rope #6 – solution here
- Lights Out #5 – solution here
- Tangram #9 – solution here
- Hamiltonian #5 – solution here
- Hanoi – This video on YouTube will help
- Mimic – You need to choose the bust that is mimicing another. It’s a case of just watching closely. You may need to purchase a hint
- Riddle #12 – PEACE
- Sliding Blocks #9 – Solution here – follow the screenshots. It’s not move by move but should be quite easy to follow, just make sure your screen matches the screenshot before moving to the next one.
- Draw The Line #6 – solution here
- Circular Picture – This is quite a tough one as the starting points are always different but I suggest getting the three moveable rings lined up in order at any angle and starting with the outer ring move it in any direction just one “notch” and then move the second ring to move it in line again. Repeat this until the picture has rotated around to it’s correct position.
- Tangram #10 – solution here
- Lights Out #6 – solution here
- Circuit #6 – solution here
- Burn The Rope #7 – solution here
- Riddle #13 – THREE
- Lights Out #7 – solution here
- Hamiltonian #6 – solution here
- Sliding Blocks #10 – solution here – follow the screenshots. It’s not move by move but should be quite easy to follow, just make sure your screen matches the screenshot before moving to the next one.
- Burn The Rope #8 – solution here
- Cogs – This is the final puzzle and you need to arrange the cogs so that they interlock and can power the mechanism to open the final part of the game. You should arrange your cogs like this.
")
How to line up the cogs
- Once you have sorted the cogs you have a code to submit and this is how it works. All ten numbers correspond with one of the 99 levels. Answers: [1 = 04] [2 = 36] [3 = 95] [4 = 35] [5 = 59] [6 = 50] [7 = 54] [8 = 21] [9 = 90] [10 = 70]

Final puzzle code – Congratulations you have completed the game
I really hoped that this walk-through/cheat sheet helped you complete this very entertaining game. I think Mojo Bones & Toy Studio have made a cracking puzzle game and I look forward to the next instalment.
If you found this walkthrough helpful please take a moment to leave a comment.


")

Please do check out my other walkthroughs

Recent Comments